Saturday, November 7, 2020

Card 3:  “Just Breath” Face Mask Card

It appears that face masks will be a part of our lives for a long time to come, so this is a great little carrier for a spare.  There's no bling or pop-ups, so it can easily slide in and out of a pocket or purse.  Perfect to give as a gift or keep for your own use.


Pieces Parts


Paper
* Cherry Cobbler card stock: 8-1/2” x 8-1/2” (see scoring/cutting diagram below); scraps for punches
* Patterned Paper: 4” x 4” (2 pcs.)**
* White card stock: 3-3/4” x 3-3/4”; scraps for punches

Other Stuff
* Sentiments***
* Layering Ovals Framelits Dies****
* 1-1/2” Circle Punch
* 2-1/2” Circle Punch
* Label Me Lovely Punch
* Timeless Label Punch
* Face Mask*****
* Sleeve for Face Mask******
* Adhesive: Double-Stick Tape or Tape Runner

* Unless otherwise indicated all materials used are from Stampin’ Up!
** Patterned Paper used for this sample is “Indian Summer/Milkweed” by BasicGrey
*** The sentiments used for this sample were from a Stampin’ Up! download featured earlier in 2020, but you could use any stamps in your stash, or create sentiments on your computer.  Or you can leave off the sentiments entirely for a simple holder.
**** Many dies and punches were used for the sentiments on this sample; you can actually use any punches that fit your design.  The only one that’s important is the 1-1/2” die, which is used to create the partial circle on the side of the carrier where the elastic ear straps are located.
***** The facemask used for my sample is from a box of 50 that I purchased from Big Lots (50 masks for $15) (see photo below instructions).
****** The sleeve I used for the sample was actually a ClearBag for 3-1/2” x 8-1/2” slimline cards which I trimmed down to 6” in length.  You also could use baggies to hold the masks – you would need to trim the sides so the ear-straps are outside of the bag.

Assembly

1. Score 8-1/2” x 8-1/2” card stock at 4-1/4”.  Turn sideways and score at 4-3/16”, 4-1/4” and 4-5/16”.  Cut on 4-3/16” score line and 4-5/16” score line from bottom of card stock to horizontal score line.  Cut across the 1/4" strip at the score line and discard.  (See diagram below.)


2. Use 1-1/2” Circle Punch to make a partial circle along edge of one of the 4 square sections (see photo 1 below for placement).  Then fold card stock in half and line up two sides; punch through opposite side using the first punch as a guide (photo 2).  Then open out card stock and fold up bottom flaps to punch the half circles, using the already cut half circles as a guide (photos 3 and 4).   NOTE:  If you don’t have a 1-1/2” circle punch, you can use a bottle cap or anything round in approximately that size to trace the half circles and then cut them out with your scissors.


3. Unfold all sides and turn card stock so inside is facing down.  Line up and adhere DSP and white card stock as shown in photo.


4. Turn card stock back over and use scissors or 1-1/2” Circle punch to trim DSP to card stock away from half-circles.


Now we’re getting close to the end . . . .

5. Place card stock so inside is face up.  Fold up bottom flaps and adhere sentiment on right panel as shown.


6. Open back up and flip over so you are now looking at outside, and place sentiment on front panel as shown.


7. If you have a sleeve for your face mask, slip the mask inside the sleeve and place it inside the card.  Fold the two flaps up and close the card.


8.   Now close the card, and you will be looking at the front, with two elastic ear loops showing at the right side of the holder.  Pull first one loop, and then the second, around the holder to keep it closed.


WHEW!  So many steps . . . this is definitely a project that would be easier to explain in a video, but hopefully the myriad of photos included in these instructions will help you figure out how it all comes together.

These are the face masks I found at Big Lots.  I actually had occasion to use one because I forgot my mask when I was out one day.  They're actually quite comfortable and easy to wear!


UPDATE:  While searching for something else on Amazon.com this morning, I discovered that you can get 50 masks for $9 or $10 from Amazon.com.  (11/08/2020)


Friday, November 6, 2020

Polar Bear Fun (11/05/2020)

Card 2: “Polar Bear Fun”
 
 
Pieces Parts
 
 
Paper
* Night of Navy card stock: 8-1/2” x 5-1/2”, scored at 4-1/4”
* White card stock: 5-1/4” x 4” (inside); about 5-1/4” x 3-3/8” for stitched frame
* Patterned Paper:  4-1/4” x 3”**
* Thick White card stock: scraps for die cuts
* Cinnamon Cider card stock: tiny scrap for large coffee mug
 
Other Stuff
* Cool Day stamp set and coordinating dies by My Favorite Things
* Stitched Rectangle dies
* Large Snowflakes Confetti from my stash
* Scraps of blue patterned paper for bear accessories**
* Basic Gray Stampin’ Pad
* Blue Marker (any kind will do)
* Optional: Wink of Stella Glitter Brush
* Adhesives: Double-stick tape or tape runner; Glue Dots and/or Liquid Glue
 
* Unless specifically noted, all materials are from Stampin’ Up!
** Gray Snowflake patterned paper is “Festive Sparkle” by The Paper Studio; Blue patterned paper is from “Clarity” Bitty Scrap Pad from Provo Crafts
 
Assembly
1. Fold 8-1/2” x 5-1/2” Night of Navy card stock away from score line to create card base.
2. Use Stitched Rectangle dies to cut frame from White card stock.  Save inside piece of frame for use on inside of card.
3. Adhere 4-1/4” x 3” Patterned Paper to back of frame and adhere frame to card front.
4. Use Basic Gray ink to stamp small bear, sign post, and ice float on Thick White card stock.  Cut out pieces with dies.  Use Blue Marker to color bear’s cap and stripes on sign post as shown.  OPTIONAL: Paint ice float and snow on sign post with Wink of Stella glitter brush.
5. Stamp scarf on scrap of Blue patterned paper.  Use scissors to cut out scarf; and adhere over scarf on bear.
6. Adhere ice float near bottom of frame as shown.  Adhere bear and sign post as shown.  (NOTE:  For my sample, I used Liquid Glue to adhere these pieces – you may prefer to pop them up to add a little dimension.)
7. Use Glue Dots to adhere snowflakes here and there.


Inside
8. Adhere 5-1/4” x 4” White card stock to inside of card.
9. Take inside piece of frame set aside in Step 2 above, turn it sideways, and stamp “Warm Wishes” as shown.  Adhere over 5-1/4” x 4” card stock.
10. Stamp cup on scrap of Cinnamon Cider card stock.  Cut out with coordinating die.
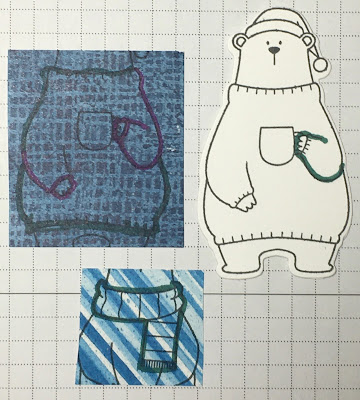
10. Stamp large bear on Thick White card stock.  Cut out with coordinating die.  Stamp sweater portion of stamp on Blue patterned paper.  Use scissors to cut out sweater, but before adhering to bear, cut the additional portions as shown in the photo below.  The thick lines show how to cut the sleeves and hands so the hand to the left shows through the sweater, and the hand to the right can be pulled up slightly to slide the handle of the coffee cup under it.  NOTE:  You also will need to cut around the bear’s arm and hand on the right side to slide the handle of the coffee cup under it – see thick green line below.
 
 
11. Once all pieces are cut as shown, adhere sweater to bear (I used Liquid Glue because it gives you a little extra “wiggle” time to move it into position.)  Slightly pull up hand on right, apply liquid glue to back of cup and slide handle under hand.  Glue bear to inside as shown.
12. Use Glue Dots to add a few snow flakes here and there.
 
What a cool winter card!  Right?!  Hope you enjoy it.

Simply Thankful (11/04/2020)

Card 1: “Simply Thankful”

This fun fold card uses one of my favorite fall paper designs.  The colors are so vivid they always make me smile! 


Pieces Parts 


Paper

* Cajun Craze card stock: 5-1/2” x 11”, scored at 4-1/4” and 8-1/2”; 4” x 1-5/8”
* Tip Top Taupe card stock: 5-3/8” x 4-1/8”; 5-3/8” x 4”; 5-3/8” x 1-5/8”; 2-5/8” x 1-7/16”; 3-1/8” x 7/8” **
* White card stock: 5-1/4” x 4”; 2-1/2” x 1-5/16”; 3” x 3/4"
* Patterned Paper: 5-1/4” x 3-7/8”; 5-1/4” x 1-1/2”; 3-1/2” x 1-1/4” ***

Other Stuff

* Country Home stamp set (“Simply Thankful”)
* Thankful by RaisinBoat (“Happy Thanksgiving”)****
* Birds & More Dies (leaves border on front flap)
* Delightful Tag Topper Punch
* Early Espresso Seam Binding Ribbon (about 22”) ***
* Adhesives: Double-sided tape or tape runner 

* Unless otherwise indicated, all products are by Stampin’ Up!
** Retired Stampin’ Up! product
*** Patterned Paper used in this card is “Fall Leaves” by The Paper Studio
**** Unfortunately, RaisinBoat is no longer in business.

Assembly

1.     Fold away from score lines to create card base.  Cut away 1/8” from 4-1/4”-wide panel to allow the  card to fold smoothly.

2.      Use Birds and More border die to create leaves border on front flap.


 3.       Inside.  Open up card and adhere 5-3/8” x 4-1/8” Tip Top Taupe to inside (center panel); adhere White card stock over Tip Top Taupe; adhere 3-1/2” x 1-1/4” Patterned Paper as shown.  Stamp “Happy Thanksgiving” on 2-1/2” x 1-5/16” White card stock and adhere to 2-5/8” x 1-7/16” Tip Top Taupe card stock; center and adhere to Patterned Paper. 


4.       First Flap.  Flip card stock over so you’re looking at the back.  On first panel (4-1/8”), adhere 5-3/8” x 4” Tip Taupe card stock; adhere 5-1/4” x 3-7/8” Patterned Paper over Tip Top Taupe.

5.       Front Flap.  Leave center panel blank and move to the front panel (right side panel).  Adhere 5-3/8” x 1-5/8” Tip Top Taupe card stock to panel between fold and leaves border; adhere 5-1/4” x 1-1/2” Patterned Paper over Tip Top Taupe.

6.       Tag.  Use punch to trim short edges of 4” x 1-5/8” Cajun Craze card stock.  Stamp sentiment on 2-1/2” x 1-5/16” White card stock; adhere to 2-5/8” x 1-7/16” Tip Top Taupe card stock; adhere this piece to Cajun Craze card stock.

7.       Feed ribbon through holes in tag, starting from the front on the left edge, running it across the back of the tag, and bringing it back out through the hole on the right side.  Make sure the ribbon isn’t twisted in the back.  Adhere tag to flap with adhesive above and below the ribbon, leaving the ribbon free to slide back and forth through the holes.  (NOTE: Apply adhesive only to back of left side of tag to attach it to the panel; if you apply adhesive to the right side, you will glue the card shut!)

8.       Now you can close the card and adjust the ribbon to whatever lengths you need to make a bow at the right side of the card.


Whew!  A little confusing!?  Hopefully, the photos help to explain some of this.


Thursday, November 5, 2020

Sending Best Wishes (10/22/2020)

 Card 1: “Sending Best Wishes”


This card has a ton of pieces parts, but actually assembly is fairly simple – just a matter of layering up and popping up a few things here and there.
 
Materials included in kit

 
Paper
* Tip Top Taupe** card stock: 8-1/2” x 5-1/2”, scored at 4-1/4”; 3-3/4” x 1-5/8” (3 pcs.); 3-5/8” x 1-1/2” (3 pcs. embossed)
* Mossy Meadow card stock: 5-3/16” x 3-15/16”; 3-1/2” x 1-1/2”; scraps for foliage die cuts
* Pear Pizzazz card stock: scraps for leaves die cuts
* White card stock: about 3-1/4” x 1-1/4” for Stitched Rectangle die (sentiment)
Inside
* Mossy Meadow card stock: 5-1/4” x 4”; scrap for foliage die cut
* Pear Pizzazz card stock: scrap for leaves die cut
* White card stock: 5” x 3-3/4”
 
Other Stuff
* Leaves and foliage dies***
* Stitched Rectangles Dies
* 3D Embossing Folders:  Ornate Floral, Pinewood Planks and Seabed,
* Adhesives:  Double-sided tape or tape runner; liquid glue; foam tape or foam hexagons
 
** Tip Top Taupe card stock is a retired Stampin’ Up! product
*** Leaves and foliage dies are from “Just Because” from Concord and 9th
 
Assembly
 
1.       Fold 8-1/2” x 5-1/2” card stock away from score line to create card base.
2.       Adhere 5-3/16” x 3-15/16” Mossy Meadow card stock to card front.
3.       Emboss each of the three 3-5/8” x 1-1/2” pieces of Tip Top Taupe card stock – each with a different embossing folder – and adhere to 3-3/4” x 1-5/8” Tip Top Taupe card stock.  Line up and adhere each piece with Foam Tape or Hexagons.  NOTE:  It’s easier to line up center piece if you adhere each of the two outside pieces first, and then center the middle piece between them.
4.       Use Liquid Glue to adhere leaves and foliage to card front as shown.
5.       Stamp sentiment and cut out with 3-1/4” x 1-1/4” Stitched Rectangle die.  Adhere to 3-1/2” x 1-1/2” Mossy Meadow card stock.  Adhere to card front with Foam Tape or Hexagons.
 
 
Inside
6.       Adhere 5-1/4” x 4” Mossy Meadow card stock to inside of card; adhere 5” x 3-3/4” card stock over Mossy Meadow.  Use Liquid Glue to adhere one set of leaves and one piece of foliage as shown.

Scary Night Cat (10/22/2020)

 Card 2: “Scary Night Cat Card”

 
the card base for this card was an idea I copped from a friend . . . it opens kind of like a Dutch door – without the top portion of the door.
 

Materials included in kit


 Paper
* Black card stock: 11” x 4-1/4” (card base); 5-1/2” x 2-1/2”; scraps for bats
* White card stock: 5-7/16” x 4-3/16” (inside)
* In Good Taste Designer Series Paper: 5-1/2” x 2”; 5-1/2” x 3/16”
* Black Glitter Paper: Scrap for cat punch
* Kraft Patterned Paper: 2” x 1-3/8” (2 pcs. for Postage Stamp punch)
 
Other Stuff
* Halloween Magic Die (bats)
* Old World Paper 3D Embossing Folder
* Tasteful Textile 3D Embossing Folder
* Black Spider Web Doily**
* Cat Punch
* 2” Circle Punch
* Postage Stamp Punch
* Black Ink
* Stampin’ Sponge
* White Craft Ink
* “Scary Cats and Bats” stamp set (Happy Halloween sentiment)
* Glittered Spider Stickers
* Adhesives: Liquid Glue; Foam Tape or Hexagons; Double-sided Tape or Tape Runner
 
** Kraft paper is from my stash (unknown origin); Scary Cats and Bats die is from Prickley Pear; Glittered Spider Stickers are from Martha Stewart Crafts.
 
Assembly
 
1.       Score 11” x 4-1/4” black card stock at 5-1/5”; use Xacto knife or paper cutter to cut along score line from top of card to 2-1/4” from top.  Rotate paper a quarter turn and cut from score line to edge of paper.  This will create the bottom of the “Dutch door” for this card.


2.       Beginning with the inside of the card, stamp sentiment on white card stock toward the right side of the card stock and about 3” from the top.  Adhere to inside of card.  NOTE:  Card stock is placed just slightly inside the edges of the card so it doesn’t poke out from behind the black card stock that will be added in Step 3.
3.       Punch 2” circle about 3/4" from left side and 1/4” from top of 5-1/2” x 2-1/2” card stock.  Emboss with Old World Paper 3D embossing folder.  Pull White stampin’ pad across “bumpy” side of card stock to create creepy white streaks in sky.  Adhere to inside of card against top edge.
4.       Punch two Postage Stamp shapes from Kraft paper.  Trim bumps from long side of one piece, and along short side of other piece.  Use Stampin’ Sponge to apply blank ink around edges.  Adhere first shape near left side of inside of card with the flat side against the bottom; use Foam Tape or Hexagons to apply second shape over the first one as shown with the flat side against the bottom of the card.
5.       Punch Cat from Black Glitter Paper.  Use Foam Tape or Hexagons to adhere as shown.
6.       Use Halloween Magic Die to cut 3 small bats from Black card stock.  Adhere with Glue Dots or Liquid Glue in scary sky wherever you like.


7.       Card Front: Adhere In Good Taste 5-1/2” x 2” Designer Paper over front flap.
8.       Apply Foam Tape or Hexagons (optional) to back of 5-1/2” x 3-16” DSP; adhere to top edge of flap.  NOTE:  I used 1/4" black foam tape which I purchased from a local vendor.
9.       Cut 2” from one side of Black Spider Web Doily.  Apply tiny dots of Liquid Glue to back of doily, tuck flat edge up under edge of 5-1/2” x 3/16” DSP and adhere to card front.
10.   Apply Glitter Spider Sticker as shown.  Use think Sharpy or other Black Marker to draw line from spider to edge of 5-1/2” x 3/16” DSP.
 
BOO!!!  Happy Halloween!

Big Thank You (10/22/2020)

 Card 3: “Big Thank You card”

 
This fun card uses a Window Sheet to connect top and bottom so the Thank You appears to be floating above the card.
 
 
Materials included in kit
 

Paper
* Pretty Peacock card stock: 5-3/4” x 5-1/2”, scored at 1-1/2”; 5-1/2” x 1-1/4”; about 3-1/4” x 2-1/2” for die cut
* White card stock: 5-1/4” x 1-1/4”; 5-1/4” x 1”; 2-1/2” x 1-1/4” (sentiment); 5-1/4” x 4” (inside)
* Forever Greenery DSP: 5” x 1”; 5” x 3/4"
* Window Sheet: 5-1/2” x 4-7/16”
 
Other Stuff
* Another Thank You stamp set**
* Painted Harvest stamp set**
* Pretty Peacock Stampin’ Pad
* Pop ‘n Swap Dies***
* Pear Pizzazz Shimmer Ribbon (about 4”) **
* Adhesives: double-sided adhesive or tape runner; glue dots; foam tape or hexagons
 
** Stamp sets and ribbon are retired Stampin’ Up! products.
*** Pop ‘n Swap Dies are from Karen Burniston
 
Assembly
 
1.       Fold Pretty Peacock 5-3/4” x 5-1/2” card stock away from score line to create card base.
2.       Apply 5-1/2” x 1-1/4” Pretty Peacock paper along one long edge of Window Sheet.
3.       Apply double-sided tape or tape runner along inside of short flap of card base.
4.       Place Window Sheet on inside of card, lining up top edge at fold (do not place over fold) and bottom edge (with card stock facing up) at the bottom of inside of card.  Fold top flap of card front over Window Sheet to adhere.  Now you should have a full card with the front being the Window Sheet with card stock at top and bottom.  It will look something like this on the inside.  (Oops!  Mine is a little crooked . . . .)


5.       On top flap, adhere 5-1/4” x 1-1/4” White card stock.  Over that adhere 5” x 1” DSP.
6.       On bottom flap, adhere 5-1/4” x 1” White card stock.  Over that adhere 5” x 3/4" DSP.
7.       Cut scalloped rectangle from Pretty Peacock card stock.  Stamp Thank You on 2-1/4” x 1-1/4” card stock and adhere to scalloped rectangle.  Apply Foam Tape or Hexagons to back of Pretty Peacock card stock and adhere as shown to front of card.
8.       Tie loose knot in ribbon and adhere at bottom of sentiment with a Glue Dot behind the knot.


9.       Inside:  Stamp sentiment in center of 5-1/4” x 4” White card stock so it’s covered up by front label; adhere card stock to inside of card.
 
That’s it!  Three great cards finished!

Magic in this Night (10/15/2020)

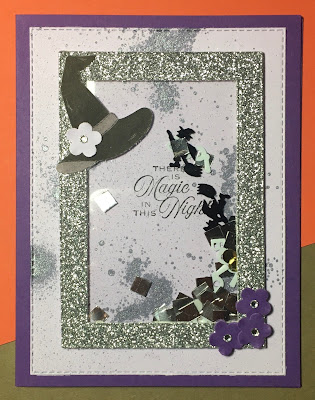
 Card 1: “Magic in this Night”


This fun and easy shaker card is kind of a girly, “unspooky” Halloween card.  Thanks to Stampin' Up! Demonstrator Jill Hayden Peterson for this fun design!

 
Materials included in kit


Paper
* Gorgeous Grape card stock: 8-1/2” x 5-1/2”, scored at 4-1/4”; scraps for punched flowers
* Purple Posy card stock: 5-1/8” x 3-3/4” (2 – one for front and one for inside); scraps for punched flowers**
* Silver Glimmer Paper (frame): outside measurement is 4-3/8” x 3”; inside measurement is 3-9/16” x 2-3/16”**
* Window Sheet: 4-3/16”x 2-13/16”
* White card stock (inside): 4-7/8” x 3-1/2”
* Hallows Night Magic Stamp Set
* Black Ink
* Witch’s Hat from September Paper Pumpkin, a monthly papercrafts kit available from Stampin’ Up!
* Stampin’ Spritzer, filled with a combination of rubbing alcohol, Iridescent Medium by Artist’s Loft, and purple refill ink from Stampin’ Up!
* Trio Flower Punch (retired Stampin’ Up! product)
* Clear Rhinestone Jewels
* Stitched Rectangle Dies
* Miscellaneous confetti inside shaker frame is from my stash
* Adhesives:  Tape runner or liquid glue; foam tape or foam hexagons; glue dots
 
** Purple Posy card stock and frame were cut using a Big Shot and Stitched Rectangle Dies
 
Assembly
1.       Fold 8-1/2” x 5-1/2” Grape card stock away from fold to create card base.
2.       Adhere spritzed and stamped Purple Posy stitched rectangle to card front.
3.       Use double-sided adhesive to adhere window sheet to back of silver frame.  Adhere foam tape all around back side of frame over window sheet, being sure that all pieces meet so confetti doesn’t fall out of frame
4.       Place confetti at center of Purple Posy card stock and kind of spread it around so the pieces aren’t all stacked up on top of each other, which would impede movement once assembled.  TIP:  You really don’t need a lot of confetti to make a good shaker card – sometimes more is just more and doesn’t shake well.
5.       Remove backing from foam tape and carefully place frame over confetti, centering on Purple Posy card stock.  TIP:  Before adhering foam tape to acetate sheet, swipe inside edges of tape with an Embossing Buddy or Powder Tool to keep the pieces from sticking to the sides of the foam tape.  (Thanks to my friend Kirsten for this tip!)  If you don’t have either of these tools, use a small paint brush and lightly “paint” inside edges of tape with talcum powder or corn starch (be sure to tap away any excess before removing tape backing).
6.       Use scissors to cut out witch’s hat; adhere to frame as shown with glue dots.  Use glue dots to adhere flowers wherever you like (refer to photo for ideas on placement).  Place a self-adhesive rhinestone in the center of each flower.


Inside
7.       Adhere blank Purple Posy stitched rectangle card stock to inside of card.
8.       Adhere stamped white card stock over Purple Posy card stock.
9.       Adhere a few flowers wherever they make you happy.

Sunflower Easel Card (10/15/2020)

 Card 2: “Sunflower Easel Card”


This easy to make easel card is a great way for your friends to remember you; the beautiful sunflower and your sentiment can be displayed on their desk or table.  This design is thanks to Beth McCullough.  To see this and other designs by Beth, visit StampingMom.com.
 
Materials included in kit

 
Paper
* Early Espresso card stock: 5-1/2” x 4-1/4” (card base); 3-13/16” x 2-3/4” (mat for focal piece); about 5” x 3” (Sunflower die cuts)
* Mossy Meadow card stock: 4” x 1” (2 pcs.), embossed with Coastal Weave 3D embossing folder**; 3-3/8” x 2-1/2” (focal piece); 3-1/4” x 1”, trimmed at each end with Lovely Labels Pick-a-Punch
* Crushed Curry card stock: 8” x 3-1/8”, scored at 2” and 4”
* White card stock: about 3” x 3” (stamped sunflower); 2-3/4” x 2-3/8” (inside); 3” x 3/4”, trimmed at each end with Lovely labels Pick-a-Punch
 
Other Stuff
* Celebrate Sunflowers stamp set
* Peaceful Moments stamp set (sentiment)
* Crushed Curry Ink
* Black Ink
* Wink of Stella Clear Glitter Brush
* Adhesives: Double-sided tape or tape runner; Liquid Glue; Foam Tape or Hexagon
 
** Embossing Folder is retired Stampin’ Up! product.
 
Assembly
1.       Adhere 2 pieces of 4” x 1” Mossy Meadow card stock to card base, one about 1/8” from left edge and one about 1/8” from right edge.
2.       Fold Crushed Curry card stock away from score lines; center and adhere 4” x 3-1/8” panel between two Mossy Meadow strips.


3.       On inside, adhere 2-3/4” x 2-3/8” white card stock about 1/4” from top edge.
4.       Trim edges of both the 1” wide Mossy Meadow card stock and the 3/4" wide white card stock with Lovely Labels Pick-a-Punch (finished sizes are 3” x 1” and 2-3/4” x 3/4".  Stamp sentiment on white card stock with black ink, and adhere to Mossy Meadow card stock.  Use Foam Tape or Hexagons to adhere assembled label about 1/4" below white card stock on inside of card.  (NOTE: It is important to pop up this sentiment because that’s what the front panel will catch on to stand up properly.)


5.       Adhere BOTTOM HALF of 3-13/16” x 2-3/4” Early Espresso card stock to BOTTOM PANEL of card front.  NOTE:  It’s important to not adhere top half as this will interfere with folding the 2” score line to set up the easel.  Adhere Mossy Meadow card stock to Early Espresso card stock.
6.       Use Crushed Curry ink to stamp sunflower on white card stock; cut out with solid sunflower die.  Cut detailed sunflower, center, and leaves from Early Espresso card stock.  Use liquid glue to adhere detailed sunflower over stamped sunflower, carefully aligning petals.  Use liquid glue to adhere detailed leaves to Mossy Meadow card stock as shown.  Adhere sunflower over leaves.  Pop up flower center with Adhesive Foam.  OPTIONAL: Paint center with Wink of Stella glitter brush.
 
Now you’re ready to open and set up your card to display the message.
 

Autumn Leaves (10/15/2020)

 Card 3: “Autumn Leaves”


Saving the easiest card for last, this one is just a matter of layering up the pieces and adhering in place.  Thanks to Becky Stoddart for this great design.  To see more of Becky's designs, visit Scrappin' and Stampin' in GJ.
 
Materials included in kit
 

Paper
* Very Vanilla Thick card stock: 8-1/2” x 5-1/2”, scored at 4-1/4”
* Patterned Paper: 5-1/4” x 4” for bottom layer
* Patterned Paper 2: 3-3/8” x 3-3/8” for second layer
* Very Vanilla card stock: 4-1/4” x 3”
* Patterned Paper (various): Scraps for Stitched Leaves die cuts
* Early Espresso: Scrap for “hello” die cut
Inside: Very Vanilla card stock: 5-1/4” x 4”
 
Other Stuff
* 1/8” Copper Trim for bow
* Starform Iridescent Silver round stickers
* Stitched Leaves Dies
* Greetings Thinlits Dies***
* Early Espresso Ink
* Ornate Thanks stamp set
* Aqua Painter filled with water and Early Espresso refill ink
* Adhesives: double-sided adhesive or tape runner; liquid glue; glue dots
 
** Patterned paper is from my stash
*** "hello" is from Greetings Thinlits Dies, a retired Stampin' Up! product
 
Assembly
1.       Fold Very Vanilla 8-1/2” x 5-1/2” card stock away from score line to create card base.
2.       Scrape edges of all square and rectangle patterned paper and card stock across Early Espresso stamp pad to apply thin line of ink and define edges.  Use Aqua Painter to splatter Early Espresso and water mixture over two pieces of Very Vanilla card stock.
3.       Adhere 5-1/4” x 4” patterned paper to card front.
4.       Center and adhere 3-3/8” x 3-3/8” patterned paper over first layer.
5.       Stamp “my friend” as shown on 4-1/4” x 3” Very Vanilla card stock.  Center and adhere card stock over patterned paper.
6.       Use liquid glue to adhere “hello” to Very Vanilla card stock above “my friend.”
7.       Cut Stitched Leaves from patterned paper.  Adhere one at a time to card front as shown.
8.       Make small bow with Copper Trim and adhere over stem of top leave with a glue dot behind the knot.


9.       Inside: Adhere small leaf to 5-1/4” x 4” Very Vanilla card stock.  Adhere to inside of card.
 
That’s it!  Three fun fall cards finished!

Just Be Happy (10/08/2020)

  Card 1:  Just Be Happy


 Materials included in kit

  •  Merry Merlot card stock: 8-1/2” x 5-1/2”, scored at 4-1/4” to create card base
  •  Inside: White card stock: 5-1/4” x 4”
  •  Front: White card stock: 5-1/4” x 4”; Designer Paper*: 5” x 3-3/4”; 3-3/4” x 2-1/4”; Merry Merlot card stock: 3” x 2-3/4” (mat for sentiment); White card stock: 2-3/4” x 2-1/2” (sentiment); Braided Linen Trim: about 1”
  • Other supplies needed:  Basic adhesive (tape runner); glue dot (optional); foam tape or Stampin’ Dimensionals.

* Designer Paper by Basic Grey: “Indian Summer/Gooseberry” for 5” x 3-3/4” piece; “Indian Summer/Cordovan” for 3-3/4” x 2-1/4” piece.  Sentiment is from “Willow” stamp set by onecanoetwo.


Assembly

  1. Inside:  Adhere 5-1/4” x 4” card stock to inside of card.  (TIP: If you are stamping a sentiment on the inside, wait to adhere card stock until after you’ve stamped – that way, if you make a boo-boo, you can always turn it over and try again on the other side.)
  2. Front:  Adhere 5-1/4” x 4” White card stock to front of card.  Adhere larger piece of Designer Paper over White.  Adhere smaller piece of Designer Paper over larger piece, with striped design going from left edge to right edge of larger piece (refer to sample for placement).
  3. Wrap linen trim from back to front around bottom of White card stock with stamped sentiment, and tie a knot in the front.  Slide a glue dot under the knot to secure.  Adhere to Merry Merlot 3” x 2-3/4” card stock.  (TIP:  I found it helpful to apply some adhesive to back of card stock, and then place the trim over it to hold it in place.  This makes it easier to tie the knot on the front.)
  4. Use foam tape or Stampin’ Dimensionals to adhere sentiment to card front.

Pumpkin Patch (10/08/2020)

  Card 2: Pumpkin Patch


Materials included in kit

  • Naturals Ivory card stock: 8-1/2” x 5-1/2”, scored at 4-1/4"
  • Inside: Very Vanilla card stock: 5-1/4” x 4”
  • Front: Very Vanilla card stock: 4-1/2” x 3-1/2” (embossed and spritzed with shimmer mist); Wood Designer Paper: 5-1/2” x 2-1/2”; Leaves Designer Paper: 5-1/4” x 1-3/4” (cut at an angle to accommodate slanted position); pumpkins stamped and cut from Cinnamon Cider, Hello Honey (retired), and Peach Parfait (retired) card stock; Gold Foil sprigs; Everyday Sequins; 3-loop bow made from Linen Thread and Gold Metallic Thread
  • Other supplies needed:  Basic adhesive, Glue Dots, and Liquid Glue


* Wood Designer Paper: “In Good Taste” by Stampin’ Up!; Leaves Designer Paper: “Fall Leaves” by The Paper Studio.   Naturals Ivory card stock is a Stampin’ Up! retired item.  Pumpkins from “Gather Together” by Stampin’ Up! are stamped with black ink and cut out with Brother Scan ‘n Cut (or fussy cut).  “Tasteful Textiles” 3D Embossing Folder, “Sprig” punch, “Everyday Sequins”, Linen Thread, and Gold Metallic Thread (retired) are from Stampin’ Up!

Click HERE for information on making loopy bows with a FREE bowmaker that you can construct from a chunk of Styrofoam and a skewer!

Assembly

  1. Fold 8-1/2” x 5-1/2” card stock away from score line to create card base.
  2. Front: Adhere Wood Designer Paper along bottom edge of card front.  Adhere Leaves Designer Paper at right edge of card, angled down to the bottom left over Wood paper.  Adhere embossed and shimmered paper over Designer Papers (refer to photo for placement).**
  3. Use Liquid Glue to adhere pumpkins and sprigs as shown in photo.  Adhere sequins wherever they make you happy using Glue Dots or Liquid Glue.  (NOTE: If using liquid glue, test it first to make sure it will hold the sequins to the paper; some glues are specifically made for paper-to-paper applications).
  4. Attach bow with a glue dot behind the knot.

** To make the shimmer paper, I first embossed it using my Big Shot and the embossing folder listed above.  Then I spritzed a fine spray of a mixture of water (you also can use alcohol for a quick-drying mixture), Artist’s Loft Iridescent Medium, and Champagne All-Purpose Ink (from Stampin’ Up!).  While it was still wet, I spritzed a more splotchy spray of the same mixture, to which I added several drops of Mossy Meadow (dark olive green) refill ink.  As the paper dried, the green lightened up quite a bit.

Pumpkin Fun Fold (10/08/2020)
 Card 3: Pumpkin Fun Fold


 Materials included in kit

  • Thick Vanilla card stock: 11” x 5-1/2”, scored at 1-3/4”, 5-1/2”, and 9-3/4”
  • Front: Early Espresso card stock: 5-1/4” x 3-1/2”; Designer Paper: 5” x 1-3/4”
  • Flaps: (1) Early Espresso card stock: 5-1/4” x 1-1/2”; Designer Paper: 5” x 1-1/4”; (2) Early Espresso card stock: 5-1/4” x 1”; Designer Paper: 5” x 3/4"
  • Inside: Early Espresso card stock: 5-1/4” x 4”, Vanilla card stock: 5” x 3-3/4”
  • Belly Band: Early Espresso card stock: 11” x 1”; True Thyme card stock (retired): about 2-1/2” x 2-1/2” for Scalloped Circle; Tangerine Tango card stock (retired): about 2-1/4” x 1-3/4” for Pumpkin; Early Espresso card stock: tiny scrap for Stem.  Early Espresso Classic Stampin’ Pad for Pumpkin stamp; Linen Thread for 3-loop bow.  Adhesives:  Regular adhesive (i.e., tape runner); Glue Dot for bow.

* “Welcome to the Jungle” Designer Paper by KaiserCraft.  All other materials by Stampin’ Up! – Apple Builder Punch; 2-1/2” Scallop Circle Punch (retired); Tasteful Textiles 3D Embossing Folder for pumpkin.


Assembly

Fold 1-3/4” score line toward the back, creating first flap; fold 5-1/2” score line forward, creating card base; fold 9-3/4” score line forward, creating second flap.


Front
: Adhere 5-1/4” x 3-1/2” Early Espresso card stock to front of card; adhere 5” x 2-3/4” Designer Paper about 1/8” from left edge of Early Espresso card stock.
Flap 1: Fold first flap down over card front and adhere 5-1/4” x 1-1/2” Early Espresso card stock; adhere 5” x 1-1/4” Designer Paper over Early Espresso card stock.
Flap 2: Fold second flap down over first flap and adhere 5-1/4” x 1” Early Espresso card stock; adhere 5” x 3/4" Designer Paper over Early Espresso card stock.


Inside:  Adhere 5-1/4” x 4” Early Espresso card stock to inside of card; adhere 5” x 3-3/4” Vanilla card stock over Early Espresso card stock.


Belly Band: Wrap 11” x 1” Early Espresso card stock from back to front around card; overlap ends and adhere overlapped portion.  DO NOT adhere belly band to card – you want to be able to slide it off to open card.  (NOTE: Do not wrap the belly band too tightly – you want it to be loose enough to slide it off the card, but tight enough that it won’t fall off.)


Adhere Pumpkin to Scalloped Circle; use Liquid Glue or a Glue Dot to adhere Stem to Pumpkin.  Use Liquid Glue or other strong adhesive to adhere Scalloped Circle to belly band, covering seam.  Place a Glue Dot behind the knot of the bow and adhere to Pumpkin.