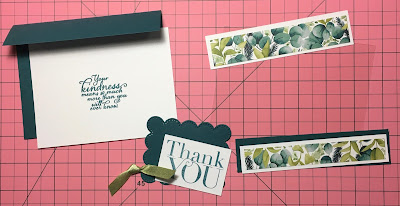
Card 3: “Big Thank You card”
This fun card uses a Window Sheet to connect top and bottom so the Thank You appears to be floating above the card.
Materials included in kit
* Pretty Peacock card stock: 5-3/4” x 5-1/2”, scored at 1-1/2”; 5-1/2” x 1-1/4”; about 3-1/4” x 2-1/2” for die cut
* White card stock: 5-1/4” x 1-1/4”; 5-1/4” x 1”; 2-1/2” x 1-1/4” (sentiment); 5-1/4” x 4” (inside)
* Forever Greenery DSP: 5” x 1”; 5” x 3/4"
* Window Sheet: 5-1/2” x 4-7/16”
* Another Thank You stamp set**
* Painted Harvest stamp set**
* Pretty Peacock Stampin’ Pad
* Pop ‘n Swap Dies***
* Pear Pizzazz Shimmer Ribbon (about 4”) **
* Adhesives: double-sided adhesive or tape runner; glue dots; foam tape or hexagons
*** Pop ‘n Swap Dies are from Karen Burniston
2. Apply 5-1/2” x 1-1/4” Pretty Peacock paper along one long edge of Window Sheet.
3. Apply double-sided tape or tape runner along inside of short flap of card base.
4. Place Window Sheet on inside of card, lining up top edge at fold (do not place over fold) and bottom edge (with card stock facing up) at the bottom of inside of card. Fold top flap of card front over Window Sheet to adhere. Now you should have a full card with the front being the Window Sheet with card stock at top and bottom. It will look something like this on the inside. (Oops! Mine is a little crooked . . . .)
5. On top flap, adhere 5-1/4” x 1-1/4” White card stock. Over that adhere 5” x 1” DSP.
6. On bottom flap, adhere 5-1/4” x 1” White card stock. Over that adhere 5” x 3/4" DSP.
7. Cut scalloped rectangle from Pretty Peacock card stock. Stamp Thank You on 2-1/4” x 1-1/4” card stock and adhere to scalloped rectangle. Apply Foam Tape or Hexagons to back of Pretty Peacock card stock and adhere as shown to front of card.
8. Tie loose knot in ribbon and adhere at bottom of sentiment with a Glue Dot behind the knot.
9. Inside: Stamp sentiment in center of 5-1/4” x 4” White card stock so it’s covered up by front label; adhere card stock to inside of card.
That’s it! Three great cards finished!


No comments:
Post a Comment