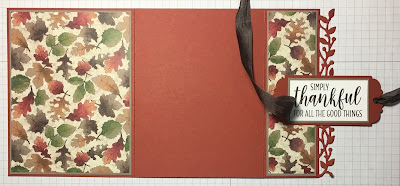
Card 1: “Simply Thankful”
This fun fold card uses one of my favorite fall paper designs. The colors are so vivid they always make me smile!
Pieces Parts
Paper
* Tip Top Taupe card stock: 5-3/8” x 4-1/8”; 5-3/8” x 4”; 5-3/8” x 1-5/8”; 2-5/8” x 1-7/16”; 3-1/8” x 7/8” **
* White card stock: 5-1/4” x 4”; 2-1/2” x 1-5/16”; 3” x 3/4"
* Patterned Paper: 5-1/4” x 3-7/8”; 5-1/4” x 1-1/2”; 3-1/2” x 1-1/4” ***
Other Stuff
* Thankful by RaisinBoat (“Happy Thanksgiving”)****
* Birds & More Dies (leaves border on front flap)
* Delightful Tag Topper Punch
* Early Espresso Seam Binding Ribbon (about 22”) ***
* Adhesives: Double-sided tape or tape runner
*** Patterned Paper used in this card is “Fall Leaves” by The Paper Studio
**** Unfortunately, RaisinBoat is no longer in business.
Assembly
1. Fold away from score lines to create card base. Cut away 1/8” from 4-1/4”-wide panel to allow the card to fold smoothly.
2. Use Birds and More border die to create leaves
border on front flap.
4. First Flap. Flip card stock over so you’re looking at the back. On first panel (4-1/8”), adhere 5-3/8” x 4” Tip Taupe card stock; adhere 5-1/4” x 3-7/8” Patterned Paper over Tip Top Taupe.
5. Front Flap. Leave center panel blank and move to the front panel (right side panel). Adhere 5-3/8” x 1-5/8” Tip Top Taupe card stock to panel between fold and leaves border; adhere 5-1/4” x 1-1/2” Patterned Paper over Tip Top Taupe.
6. Tag. Use punch to trim short edges of 4” x 1-5/8” Cajun Craze card stock. Stamp sentiment on 2-1/2” x 1-5/16” White card stock; adhere to 2-5/8” x 1-7/16” Tip Top Taupe card stock; adhere this piece to Cajun Craze card stock.
7. Feed ribbon through holes in tag, starting from the front on the left edge, running it across the back of the tag, and bringing it back out through the hole on the right side. Make sure the ribbon isn’t twisted in the back. Adhere tag to flap with adhesive above and below the ribbon, leaving the ribbon free to slide back and forth through the holes. (NOTE: Apply adhesive only to back of left side of tag to attach it to the panel; if you apply adhesive to the right side, you will glue the card shut!)
8. Now you can close the card and adjust the ribbon to whatever lengths you need to make a bow at the right side of the card.


No comments:
Post a Comment